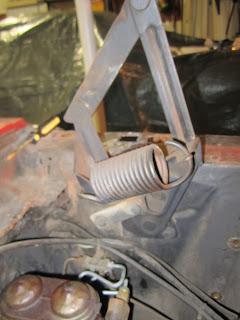
OK so getting into day 13:
1. Removed the Hood Spring Units:
Pretty straightforward, needed to get them out of the way to keep grinding. There's 3 bolts, accessed from inside the engine bay, and they bolt into 3 nut clips that are welded to the body.
2. Removing the Passenger Side Front Suspension
All of this is detailed in my previous post about removing the driver's side front suspension. Please see that for reference.
Day 14 and 15:
3. Removing the Gas Tank:
-First you need to drain it, locate the drain plug on the back right hand side of the tank. Make sure you know how much gas is in there and choose a bucket that's large enough.
- Then you need to remove the filler arm assembly from the top of the tank. Unscrew the gas cap and you will see underneath there are 5 screws with nuts (on the inside). Remove the nuts and bag and tag. There is also a rubber hose with 2 clamps to the tank itself, both clamps have a single phillip's screw that needs to be loosened:
- Once you have that done you need to remove the fuel sensor and fuel line from the tank. There in the same place at the back of the tank. The sensor just pulls off, the line is connected with a rubber connector and 2 clamps that must be loosened and then wiggled off. NOTE: before you do this run the car to remove any extra gas in the line/tank. Once the car stalls you know you got it all.
- Finally remove the tank by removing the gas tank bolts from the trunk, they're all around the tank.
4. Removing the Exhaust System:
OK this is done in stages, first thing you want to do is remove the muffler and tail pipe. What a huge pain in the ass this was, if I did it again I would probably remove it all at once and work on it outside of the car, but whatever, just know that if it's rusted together, separating it is gonna require some surgery.
OK stage 1: Remove the Muffler
To do this there are coupling brackets to the main down pipe, tail pipe, and one hanging bracket to the body of the car. Loosen the brackets and wiggle it off the down pipe and tail pipe first, then remove from the body. Mine were just plain stuck on no matter what we did, so finally I just cut the muffler brackets open and removed it, I can always get a new muffler, they're pretty cheap:
Stage 2: Remove the Down Pipe
The down pipe is in 2 sections, but we opted to remove it straight from the engine to the rear in one step. So first we disconnected the hanger at the rear (Note: Set up a jack stand underneath the down pipe to position it on so it doesn't drop!)
Next disconnect it from the engine and do the same up front (NOTE: The return spring for the accelerator is connected to the bolt hole for the exhaust, just disconnect it and let it hang from the accelerator):
5. Removing the Horns:
Basically just remove the connecting cable from the horn harness and remove the single bolt from the body that holds them on, there are 2 up front...
6. Removing the Radiator:
First you need to drain the coolent system. To do this we disconnected the lower radiator hose so that both the engine and radiator would drain into the bucket.
Next disconnect the upper hose and overflow hose.
Finally there are 4 bolts with nut clips that connect the radiator to the body, remove these and remove the radiator.
7. Removing the Radiator Overflow Container and Windshield Washer Fluid Reservoir (w/ motor):
For the radiator overflow container it's just a single screw at the top and the overflow line to the radiator which has already been removed.
For the windshield washer fluid reservoir it's 2 bolts to the body (one on top and one at the motor on the bottom). The motor is connected to the reservoir, disconnect power and ground cable from motor. Be careful when disconnecting if there's water still in it, hold your thumb over it to stop flow and then drain into a bucket or outside.
That's it for now, I think tonight we're pulling the engine and transmission, so get ready for that!
Tim


No comments:
Post a Comment