Came home from work and this was at the door step:
Went through it all and cataloged it, there's a lot more coming, but it's nice to start organizing...
OK so last night we did a lot. Sweeney came over and lent us a hand, with 3 of us we trucked through it till about 2 AM. It was a good time, we got the front end done, the rear done and the passenger side door off. Sweeney took a look at the most problematic areas and feels he can do a lot of the patch work, so I guess we're getting a welder. He's also going to ask a buddy of his to do the glass work and his dad to help with the painting, so things are moving along nicely.
1. Removing the Front Turn Signal Light Housings:
Start by disconnecting the wiring harness, the turn signal lights are connected to the headlight light harness, simply pull the harness apart and push the turn signal light wires down through the access hole:
Once you do that you can disconnect the entire housing, there's 2 nuts on the backside of the housing (Note: you do not need to remove the lens cap to do this). One of the two nuts has the ground wire under it, loosen and remove the ground wire, then remove completely and pull the turn signal light out.
2. Removing the Lower and Upper front Valance
To remove the lower valance (which you should do first) there are 4 bolts in the front along the top, 2 bolts in the front along the bottom, and another 4 bolts (2 on either side/end) in the back of the valance.
As you release the one side, set it on a jack stand so it's not pulling the other side down as you work:
For the upper valance there's 2 bolts (one on either side/end) above the lower valance bolts in the rear. There's also 2 bolts in the front center that can only be accessed with the lower valance off first.
3. Grille Assembly with Headlight Retainers
So the grille assembly is connected directly to the headlight retainers. With the headlight retainers already disconnected from the day before, it's already almost ready to be removed. There's 2 plates that site behind the upper valance, they're not bolted in, but the upper valance must be removed to pull the grille assembly out. There's also 3 small bolts behind the upper valance that must be removed.
4. Hood Spring Assembly:
Basically straight forward, just 3 bolts. However as with most of the things the bolts were stuck and the nuts were spinning. Even this little straight forward task took some time because we had to hold the nut on the back in a very tight space with a crescent wrench:
5. Fenders!!
Finally! OK so here's what you have to remove:
- 6 Bolts up top in the engine bay
- 3 bolts to the upper and lower valance (already removed from earlier)
- 1 bolt INSIDE the car (through an access hole)
- 1 bolt BEHIND the door hinges (up top)
- 1 bolt underneath the car between the tire and door
Then just remove the fenders (be careful, the passenger side has the antenna which also needs to be disconnected).
6. Front Bumper Brackets
Again pretty straight forward, there's a center and an outer bracket on both sides. There's 2 bolts and 4 nuts that hold them in place. They spin, so someone needs to be inside the engine bay holding the back.
7. (Moving to the rear...) Tail Lights
- 4 screws on outside plate to remove lens and gaskets
- 2 gaskets
- cap and lens
- inside 4 nuts (10 mm)
- remove wiring harness and pull out
8. Rear Bumper Guards
Basically it's 2 bolts that can be accessed from underneath the car and inside the trunk.
9. Reverse Lights
Same set up as the front turn signal lights, remove from underneath the car behind rear valance
10. Rear 1/4 panel caps
3 bolts from inside trunk (Note ground wires connected to one of them)
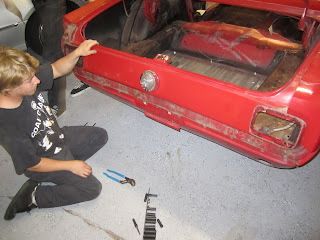
11. Rear Valance and License Plate
Believe it or not it's all phillip's head screws all along the outside of the valance.
12. Rear Bumper
Directly Next to the bolts for the bumper guards there's 2 sets of 2 bolts for the bumpers themselves:
After that we finished by removing the Passenger Side Door and finished stripping the weather strip which means BODY IS BASICALLY DONE. woooooooooo
Onward and Upward to the engine, transmission, electrical, and suspension!


No comments:
Post a Comment